
ShadowSumo V1 (WIP) // KTU Robotics
How I made my mini-sumo robot “ShadowSumo”
You might notice that this Mini Sumo is WIP. That’s because I think all robots should always be a work in progress and constantly upgraded/modified. When I make more significant changes, I will make new articles, so please follow jsumo blogs. More minor changes will be mentioned at the bottom of this article. I hope my thought process will help you make better robots and have better opponents.
But I will start off with the whole process of how I made the robot.
PCB
My first step of making was to design the main PCB. It probably took the longest to do, as I had to do a lot of iterations and wanted a lot of features. First, I wrote down what features I wanted:

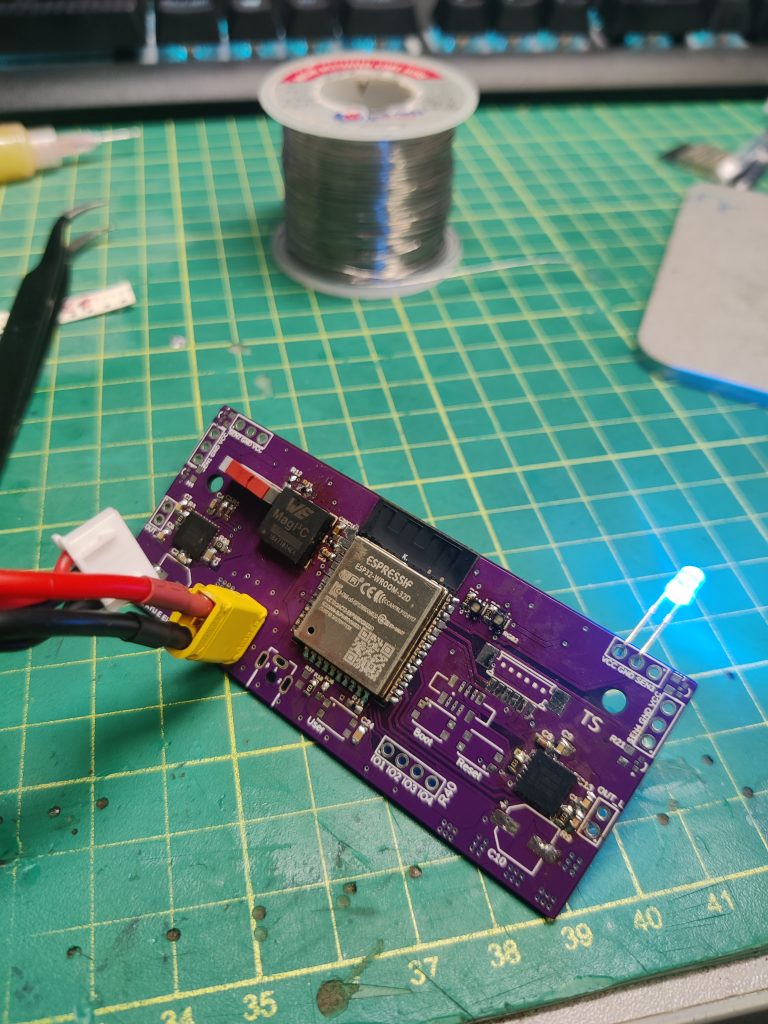
After my ideas about what I wanted from my PCB, I started making it. The process was quite fun but time-consuming. A friend from my university helped a lot as he has a Masters’s degree in Electronics engineering. I will later mention why I haven’t tested the PCB, but otherwise, it worked great. And I was amazed because it worked from the first try. The biggest problem is I missed that ESP32 drives some PWM signal while booting. It wouldn’t be a big problem, but I forgot about that and routed the IO to one of the H bridges. Because of that, the robot spins one motor on bootup/while resetting. So, when designing PCBs with ESP32, please check what ESP32 does with its pins and if they are usable.
Here are some photos of the PCB:
-

Front side -

Backside -

PCB with stencil -
First test
I designed it with Fusion360. It has excellent features like 2 RGB LEDs, ESP32 with its Wi-Fi and BLE capabilities, reverse polarity protection, very nice 3A Wurth electronic step-down module, insanely good MC33HB2002 drivers, 4 analogue inputs with resistors for TCRT1000, 4 sensor inputs, 4 external IO, user button, multiplexer because the ESP didn’t have enough IO, FFC connector breakout for start module extending, but I made a mistake not having proper 2.54mm connectors for it too.
Mechanical side
Then was the most challenging part – designing the robot. Because it wasn’t my first robot and I had some ideas already in mind, it didn’t take as long as the PCB. But it was hard figuring out what angles work better, where I wanted my CG to be. Overall I would say it turned out quite good. My robots stability is insanely good. But it’s a tradeoff with a weaker front (as I don’t have as much weight as usual in the front).
-

Center of gravity of my robot
At first, I wanted to make a lot of parts out of brass but noticed that steel density isn’t so far off from brass and that I would only gain maybe 20-40g with brass. So that’s why all most parts were made out of steel (S455). Then I considered what angle to make the front and if I needed angled or straight sidewalls. I still haven’t made up my mind and tested properly what front angle works better, but I made 25, 30, 35-degree fronts. And I decided that I would make two designs in terms of “invisibility”. One will use wider wheels and core400 motors from JSumo, but as you will see in the photos, the wheels have an “opening”. The other was totally angled sides so it would be completely invisible and would use N20 50:1 HPCB Pololu motors or modified N20/N30.
Photos of my robot:
-

Laser-cut front from AIS3040 -

One of the first tests to see how everything fits together -

“Cartridge” Lipo idea -

Side view and the Teflon wires I use -

Angled side with “opening” for wheels -

Bent AIS3040 front
I haven’t tested/made the N20 version yet as I haven’t had the time, but I think it would work well. Of course, it wouldn’t have as much torque as Core DC motors, but you gain invisibility. You might also notice that my base ‘blade’ is very nice looking. That’s because it was made interestingly. At first, made a sketch of the whole base and then sent Dxf files to a laser cutting company. Then I found a local guy who has this ‘sanding’ machine and can make smooth angles on metal. I think the sanding is done with a wet stone. He said as the process was a bit slow, he took off most of the “meat” with a hand CNC and then machined the rest with my before-mentioned machine.
Laser cut bases and CNCed wheel form + motor mounts


This is one of the best methods if you want a cheap, good base with low CG. In total, one base totalled around 15 euros. Sadly, because I used S455, the fronts are too soft to use without blades, but in theory, they would work quite well with hardening. Then another feature of my robot is wheel suspension. There is a thread in the CNCed motor mount, and the motor mount swivels. It accounts for an uneven blade that might happen when glueing it down or not straight motor mounting. When making such “suspension”, be sure to limit the movement, as too much movement isn’t good. It starts bouncing all over the place.
-

CNCed motor mount for core motors with small slot to limit movement in the screw axis -

At first, the thread was at an angle, so it had to be redone.
But I can recommend using DataCNC services. Your orders from JSumo can be combined together with orders from DataCNC. It offers pretty low prices, and you can order small amounts, unlike some other CNC companies, which only accept orders in high quantities.
Weight
Because when making the robot, I wasn’t looking at fusion properties, I was amazed that when I put everything together, it weighed almost 500g without any additional weights. But as I mentioned, I think my CG is a bit too far back, so a lighter back would work better. But because of this low and far back CG, it’s very stable, and with 3s Lipo, you can basically drive around at 100% PWM.

Sensors
Because I had legendary sharp 340k leftovers, I thought they would be the best, but it turns out no. They are slow for my robot and don’t see black objects well. That’s why I suggest you use JS40f sensors as they see blacks very well. The main problem is that they are a bit fiddly in terms of their seeing angle, but other than that, they see much better. Another consideration was to use VLX53L0X because we have made these breakout PCBs for ease of use. (they output high/low). But because I didn’t have the breakout PCBs when making the robot, I used sharps. And if you notice, there is a square hole in the front. It was supposed to be used for VLX distance measuring. But in my opinion, Pololu recently released one of the best sensors: Pololu 4071
Comparision in size. Top JS40F, then Sharp 340k, Pololu 4064 (4071 is basically the same) and VLX with breakout.

As you can see, the size is very small, only that it’s pretty wide. But in most scenarios, you can place it upright as 99.5% of robots are taller than 1cm. From my testing, it’s very nice as it outputs PWM for distance measuring with reasonable accuracy (even for blacks). The seeing angle is good too, you can place it basically straight, and it won’t see the ground, not like VL53l0x. At the time of testing, I only had 4064, which sees only up to 50cm (blacks up to ~30cm) and has a refresh rate from 50 to 110Hz. The refresh rate depends on the distance. I recently received the 4071 sensors, and they see up to 130cm with a refresh rate of 100-110hz.
Lipo selection
Right from the start I knew, that I wanted more than 2s because of higher speed and torque. At first, I wanted to jump right into 4s, but I thought maybe I should play around with 3s and see if it’s not enough for me. And from my competitions, I think 4s carries too much risk. You have to be much more careful when driving the core motors (not even talking about N20), + the gain from the higher speed isn’t much more beneficial. You would also need voltage monitoring with ‘RPM’ compensation or encoders. Then I started searching for 3 and 4s 200-500mAh Lipos. And from my research, Tattu lipos are one of the best in this small battery range but are a bit expensive. (I paid 12eur for one 450mAh 3s)
Comparision between Tattu and Rhino


As you can see, the Tattu Lipo is much smaller (and therefore denser and lighter) with the same capacity and voltage. That’s why I would suggest not cheaping out on lipos or calculating how dense they are. For example, the Tattu 450mAh 4s is 28.73cm3 58g, and the Rhino 450mAh 4s is 37.99cm3 70g. Another good manufacturer is CNHL. They have some small 300-500mAh 3-4S Lipos, but you have to hunt for them as they are constantly out of stock because of their low price.
Programming / tactics
As I mentioned, it’s not my first robot, so I had a rough idea of what tactics I wanted to use. Of course, because of my relatively high speed and stability, I needed tactics that drive around to catch the other robot off-guard or drive full-speed straight. I won’t share all of my tactics, but for example, one of them is to go around and try to catch the other robot from the backside. It worked pretty well as my robot is fast and has black sides. Another was to go around but stop at the middle, near the white line, and wait some time or while any of the sensors don’t see anything. Another was just going 100% speed straight. Just that before the white line, it slows down.
Demonstration of tactic
You can see that I can choose where the robot goes by pressing a button more times. The principle of this “modular” tactic is this: every time you press the button, it makes a variable higher (or lower). Then I multiply this variable by some amount and add this to the delay that controls how much it turns (or millis).
But more advanced tactics should be so the robot can change what it does while driving. For example, if any of the sensors don’t see for some time, it enters search mode. If it doesn’t find the other robot in search mode, then it does something else and so on.
Programming tips
One of the first things I recommend is PID control if you have more sensors. The robot becomes more stable in turning when it sees the other robot, and the programming becomes a bit easier. A more straightforward solution I had to do with my robot is oscillation when the robot is up close, and after sensing with one sensor, the other sensors see part of the other robot and get stuck in this oscillating loop. I fixed it with millis. I start measuring the time when one of the front sensors see, and if the other front sensor sees in some amount of time shorter than defined, it doesn’t turn but goes straight. The other more straightforward fix would be a front sensor that only sees straight or crossed sensors.
But what I highly suggest is detecting/filtering white spots on the ring. The method to this is that if one of the line sensors sees white, you start measuring how long you see it. If you are seeing it longer than defined, only then turn around. You find this value by trial and error, so the robot has enough time to detect proper white outline but not enough to detect spots/breaks. Combined with this, I suggest having sensor calibration before a fight as not all rings are equal. This is very important as I lost one of the battles in Robotex because I didn’t have these features. The calibration can be simple as just placing your robot on white and pressing a button saying this is white and then the same with black. A sophisticated solution would be taking a lot of samples and taking an average of that.
What was done wrong while making this robot and what could be improved?
I will start with one of my most significant findings while making it.
Please ground every metal part. (yes, connect to -) If that is not possible, atleast connect the base.
With my before-mentioned friend, we spent about 15 hours straight debugging why my PCB was resetting. We tried everything, and we were pulling our hair out. But we noticed that if we plug the CP2012 programmer into my PCB, it doesn’t reset anymore (only data and GND was connected). Then my Latvian friend suggested connecting the base to GND. And it worked! I have some guesses why that helps, but I still don’t know a proper explanation why, but definitely try it out if it’s resetting.
Debugging the PCBs
-

We tried to eliminate as many variables as possible. Added very good and big capacitors on the VIN, external voltage regulator and so on… -

Thanks to my friend as he had a DIY Arduino nano with a motor driver on board
And this problem arose only two days before Robotex. That’s why I mentioned that I haven’t tested my PCB properly, as I didn’t want to risk fighting with a brand new, untested PCB. Especially when I made the mistake of routing one of the mentioned IO to my H bridge. It would have been risky as it would have been relatively easy to get “false starts”.
Another mistake I made was making the base bit too long. Because of that, I can’t fit larger wheels, and I am a bit limited on how much of the blade I can stick out. And I would like bigger diameter wheels for more traction and speed, so it seems that I will have to cut the base or make new ones.
One other thing related to wheel size and base length is my motor mount corner. Currently, it’s not rounded, and after my robot is lifted more than 30 degrees, the wheels don’t touch the ground. And it’s pretty bad because I lost one round like this when I could have definitely won as my motors had more torque. Or having an accelerometer + gyroscope is beneficial too because you can detect when you are lifted and react accordingly (let’s say go back).
Furthermore, I still should work on my tactics as I don’t have many, and they don’t work for all situations. I already programmed the white line “filter”, which works very well.
As you can see I was about to push the Italian robot but then it thought that it saw something white and turned around….
After two competitions, I see that they are not very good unless you modify sharps, and I could have won some situations easily if I had better sensors. That’s why I will be using Pololu 4071 sensors, and I think I will have a significant advantage. Especially if I will be able to fully utilise the distance measuring feature.
I highly suggest leaving some space for a flag too. It doesn’t hurt in the worst scenarios (of course, you have to design it correctly), but you confuse the other robot and gain an advantage in most situations. That’s why I will be putting a small servo at the back.
Last but not least – the blade. After two competitions, I can say that it’s nothing special, especially compared to Latvian robots. I think that could be improved with a larger angle (I think I competed with 25-degree) and better blades. In the future, I plan to try Japanese mini-sumo blades.
But overall, I am pretty happy with my robot. It performed very well in the first competitions, and I know what places can be improved. Plus, there is space to improve, and I know where to improve.
Competitions and their analization
Currently, with my ShadowSumo robot, I competed in two competitions: Robotex 2021 and Eastrobo 2021. (This will be extended when I will participate in more competitions)
Robotex 2021
After basically a two year break in robotics, it was pretty scary and emotional to compete once again. Because robotex publicly shows who registered, it was rather frightening. There were many unknown robots, and in total, there were about 35 robots. But when we came, as always, Robotex is Robotex. They had already premade their group stage. Why is that a problem? Because only about 24 robots went to the technical inspection. So we had groups with 2 robots and groups with 5 people….. At least they redid that, but it was pretty funny as there were about 5 robots that passed through technical inspection but didn’t arrive at the fights…

So in my group, I had three other robots. (the other two didn’t arrive) One from ITLUG team (Italy), one from JBG team (Lithuania) and one Estonian. The fight against the Estonian robot wasn’t hard as it drove out itself. The battle against the Lithuanian robot wasn’t so hard, too, as the robot was relatively light (but fast!), and the blade wasn’t so good. Probably the most stressful and most challenging fight was against the ITLUG team.
Round 2 (1-0 to my advantage)
So, what happened here? Why did the robots stop when I was supposed to lose? That’s because I made these cuts in the blade, so when the robot gets lifted from the side, it gets stuck in the ring. This time it was a rematch… After all fights, I was first in my group and was quite happy.
Finals
The final bracket didn’t look good as at first I had to fight against another ITLUG robot, and then if I won, I would fight against my mate.. I don’t remember very well the first fight, but I won 2:0.
Now I had to win probably the most brutal fight, considering the other robots were quite shit (sorry :D). I mainly was scared for this match because our tactics were similar, and it was more down to luck.
First round against RG (Lithuania). 0:1 to opponents advantage
As you can see, I tried to attack 100% straight, but it didn’t work out, + my sensors didn’t see the other robot and turned too late. + my blade wasn’t good (but in my defence, he got me on my corner where it’s the hardest to defend)
Second round, 1:1
Nothing much to comment on here. The other robot didn’t see me because of my speed and black sides, and I could attack from the back. Maybe the only thing to mention is that I was using delay here, and as you can see, I didn’t notice the other robot. In this scenario, it would have been more beneficial, but in most scenarios, I believe that it’s better to have tactics with delay too because the other robot could have a flag to confuse you/they could have enough time to detect you.
Third round, I lost 2:1
Two things to take from this round. My mate said that he would be doing something stupid. I figured he would attack, so I chose a standing tactic. To clear things up, the tactic is this: the robot goes straight slightly every second for 4 seconds or until one of the sensors sees something. After that, it enters normal mode. But I was a bit dumb and forgot that the sharps don’t see anything, basically, and his robot is mainly black. But that wasn’t even the problem. He got so lucky that when he was arriving, the first second had already passed, and I started driving straight. And because I used the delay in that situation, I didn’t see him (I figured nothing can happen in ~40ms….). So after this, I dropped down to the losers bracket.
Losers bracket
All my mates were hopeful that I would go through the losers bracket as I only had to fight against two robots to get a chance to win a prize place. And when I saw that I would have to fight against ITLUG, I calmed down because I won 2:0 in the qualification stage against that robot. But as you will know, I got really unlucky….
First round 1:0 to my advantage, but I can’t find the video
Second round 1:1
Why did I lose? At first, we (me and the opponent) agreed on a rematch, but the referees decided he got the point. It was a bit sad it was the second time this was happening, and it was a rematch last time. Their argument is that the robot is more aggressive and lifted me. I didn’t argue much at that time. But it was a bit weird, mainly because it’s my design that you can’t really push it if it gets lifted. But I think in this situation, with enough power (and the other robot wasn’t very powerful, I believe), they could have pushed me.
Later (after everything), I asked the main referee if I should have lost, and he said yes because I was purposely damaging the ring. I won’t get into details this time. For me, this topic is controversial and should be talked about more.
When writing, I noticed that I lifted the opponent at first contact, but because I was using delay, I didn’t notice him. On the other hand, it is debatable if I would have enough traction to push him as this contact had a lot of inertia. But as you can see, using delays in mini-sumo tactics can be risky.
Third round, 1:2, I lost…… Probably the most rollercoaster round of all
I already showed it before and mentioned that one of the problems in this match was that my line sensors bugged out, and I turned around when I was already pushing the robot.
But two other unfortunate things happened. You might question yourself, why did I lose this round then? Because I touched the ground first. But so these things wouldn’t happen, organisers should use higher dohyos. Robotex modified the rules and made them so they can use, I think 1cm ring. And it is hard to say if I would have won if the ring was higher, but I think that yes, I would have won. Mainly because I got pushed just the slightest and had enough inertia to go back on the ring..
Now the third unfortunate thing that happened (well, in a way). I will be honest and tell. From this footage, it looks that I won, but there was footage from the side…. (and from my mate). If not that, I would have won. Of course, this is cheating in a way. But from the other side, when courts happen, the defendant walks if the plaintiff doesn’t provide enough evidence. (Innocent until proven guilty)
After everything, I tried to fight against the second and third places and won no problem as they had no tactics.
Overall recap of the competition
I think that this Robotex went quite well, especially when you consider that the robot was built a couple of days before Robotex. But as you saw, like all new robots, it lacked reliability and testing.
One more unfortunate thing happened after the event….. I managed to break my friends GoPro (dumb me…), so I was down 300 euros… So relatively unsuccessful competition as I had all the chances to win a prize place (no Latvians and no insanely good robots) and that I broke the GoPro. After it, I was pretty upset with myself.

But nevertheless, it was an insanely successful competition for Lithuanians. Šiauliai Robotics club came back with 5 medals and JBG Robotics with 4. We got all prize places in line following, third in line following enhanced and first place in mini-sumo. JBG got second place in folk race, first places in Lego sumo and 3kg Lego sumo and third in mini-sumo.
-

Our Šiauliai Robotics club -

All Lithuanians who came to Robotex. JBG + Šiauliai Robotics club
Eastrobo 2021
Overall the event was really nice compared to Robotex. It was free, you got free food, people who registered in time got T-Shirts. I really recommend coming to it and competing. There were minor things to criticise, but they weren’t something that was bothering us. Maybe the only thing that we didn’t understand why some categories had 2 or even only 1 prize place. And their point counting system was a bit dumb. I think if you won 2:1, you only got 1 point.
I don’t have any videos, but it went pretty nicely. It was a bit harder as you placed the robots back to back in the quadrants. We don’t do this format normally, so we didn’t have much experience. And when you don’t have experience, it’s hard to think what tactics to make, so we were scared. The fun was that the robots were relatively better than those who competed in Robotex. And there were 19 robots, so even more than in robotex.
As you can see the group stage went nicely

What was interesting was that here we had a lot of high-speed robots, like insanely fast. One robot used 4 Pololu 30:1 HPCB motors with 4s Lipo at 90% speed. Their main problem was that they didn’t have any tactics, and their tactic was just to spin full speed and drive in some direction when one of the sensors saw. If your sensors are slow, you will never see the other robot. But I can’t comment more as I don’t remember.
Finals
Overall it was good, as you can see. As the qualifiers, I don’t remember much too. But I will comment on the last round.

As you can see, I won against RG in Round 2 but lost in the Final Round. It was bit funny because, in the second round, I had this tactic not to spin around, but at first drive backwards. But because I didn’t test the tactic properly on these rings (they were more ‘sticky’), I just drove out myself… It was funny because we tried later and we think I should have won that round. But I wasn’t very angry because I finally won a prize place after a long time of robotics. Just that the prize was funny for Mini sumo, but do we compete for prizes or just the possibility to fight against other robots?
By the way, we should have had one more fight because I went to the finals without any looses.


Updates
Here I will later write about changes in my robot.
The end… 😀
I hope that everything was understandable and I hope that whoever is reading this article will gain something from it. If you have any questions, feel free to contact me.
Bots
Hi! Is it possible that You want share chasi blue prints from your robot?